Hey, let’s be honest. Nothing makes a great car look old faster than those cloudy, yellow headlights. You know the look, like your car is wearing foggy glasses. The sun is the main bad guy here, slowly eating away at the plastic and dimming your lights.
You’ve probably heard about ceramic coating for paint, and you might be thinking: Can You Ceramic Coat Headlights?
The answer is a big, simple YES. A ceramic coating is the clear, durable, invisible shield that stops the yellowing process dead in its tracks. It’s genuinely one of the best ways to keep your lenses looking new and shining bright. Let’s dive in and see how!
What Is Ceramic Coating and How Does It Work?
We talked about this a little before, but let’s quickly review. Ceramic coating is a liquid product that has small, tiny particles in it (called silica).
When you put it on your car’s surface:
- It chemically bonds with the paint or plastic.
- It creates a hard, clear layer.
- It’s much tougher than regular car wax or sealants, which wash off easily.
This is why people call it nanoceramic coating—because the particles are so small, they fill in all the tiny pores of the surface.
✅ Can You Ceramic Coat Headlights?
Yes, you can! Headlights are just another surface you can easily protect.
Applying a ceramic coating for headlights gives you long-lasting headlight protection coating from UV rays and dirt. The key, though, is to make sure the headlight surface is clean and clear before you apply the coating.
Why You Should Ceramic Coat Your Headlights
Why are so many car owners doing this? It comes down to protection and looks.
- Stops Yellowing: The sun’s strong rays (UV damage) hurt the plastic over time. The coating blocks this, stopping the ugly yellowing or headlight oxidation that makes your car look old.
- Easy to Clean: The coating makes the surface hydrophobic (water-repelling). Water rolls off easily, and dirt doesn’t stick as much.
- Improved Clarity: Your lenses stay clear. They look sharper, which means they work better and shine brighter, too!
Step-by-Step Guide: How to Ceramic Coat Headlights at Home (DIY Method)
If you want to try a DIY ceramic coating on your lights, here are the simple steps. This is the basic car detailing process:
Step 1: Clean and Decontaminate
Wash the headlight really well. You need to remove all dirt, bug guts, and road grime (surface prep). If you miss this step, the dirt gets sealed in!
Step 2: Polish or Restore Headlights (If Needed)
This is the most important part. If your headlight is already yellow or cloudy, you must polish it first (headlight restoration).
Remember, the coating only seals in what’s already there. If you seal in a bad surface, it will stay bad. You want the headlight to be perfectly clear before moving on.
Step 3: Apply Ceramic Coating Evenly
Use the coating pad that comes with the kit. Wipe the product on the headlight in a smooth, even way. Usually, you work in a cross-hatch pattern (side-to-side, then up-and-down). Don’t use too much!
Step 4: Allow Curing Time
The coating needs time to “cure” or harden. This can take 12 to 24 hours. Keep the headlights dry during this time. Read your product’s directions to know the exact time.
🚫 Common Mistakes to Avoid
I’ve seen this go wrong before, and it’s always because of small mistakes. Don’t let these happen to you:
- Applying on Yellow Lights: Never put the coating on cloudy or oxidized lights. You must polish it first!
- Rushing: Skipping the full curing time is a big mistake. The coating won’t stick or last as long.
- Using Too Much: A little bit goes a long way. Over-applying leads to streaks and high spots that are hard to remove later.
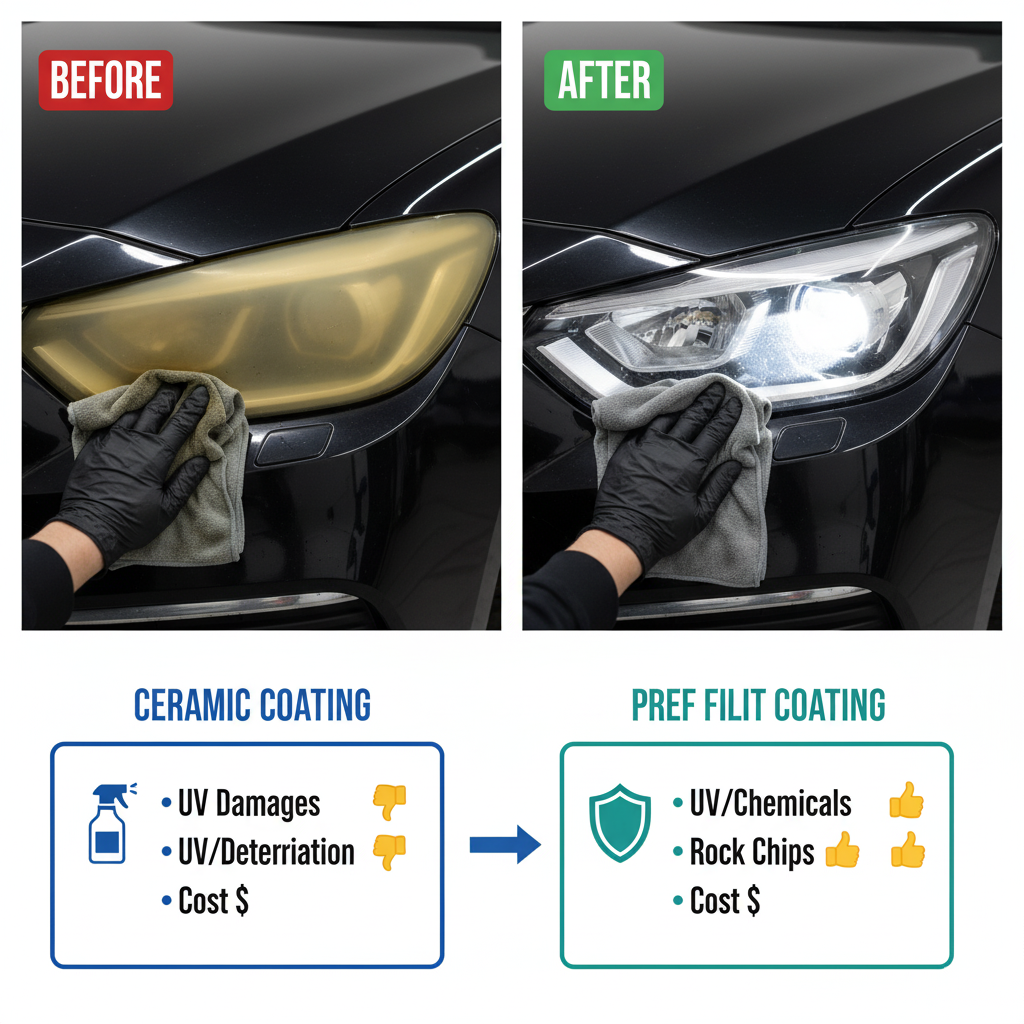
Ceramic Coating vs. PPF: Which Is Better for Headlight Protection?
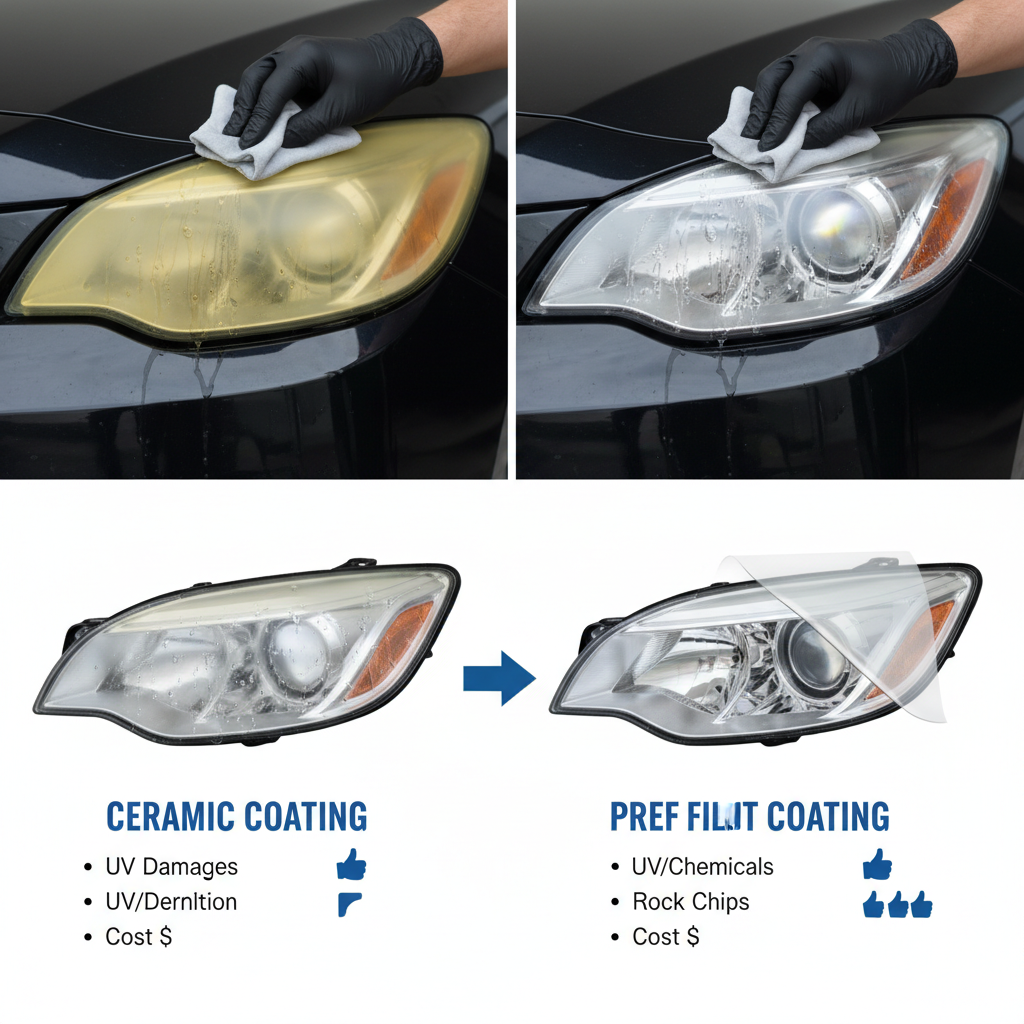
When thinking about headlight protection, you have two main choices:
| Feature | Ceramic Coating | PPF (Paint Protection Film) |
| Protection | Excellent against UV rays and chemicals. | Excellent against rock chips and physical impact. |
| Thickness | Very thin, invisible liquid layer. | A thick, clear sticker or film. |
| Cost | Less expensive. | More expensive. |
If you just want to stop yellowing and keep a great shine, the coating is perfect. If you drive a lot on rough roads and worry about rocks hitting your lights, the film offers the best physical long-term protection.
5 FAQs related Can You Ceramic Coat Headlight
1. Can you ceramic coat headlights?
Yes, you absolutely can! Ceramic coating creates a strong, transparent protective layer over your headlights that shields them from UV rays, oxidation, and road grime. It helps maintain a crystal-clear look and prevents the yellowing that often makes headlights appear old and dull.
2. How long does ceramic coating last on headlights?
A quality ceramic coating can last anywhere from 12 to 24 months, depending on the product and how well the headlights are maintained. Regular cleaning and avoiding harsh chemicals will help the coating stay effective longer.
3. Is ceramic coating better than headlight restoration?
Headlight restoration removes existing oxidation and cloudiness, while ceramic coating prevents future damage. Ideally, you should restore your headlights first, then apply a ceramic coating to lock in that freshly polished clarity for long-term protection.
4. Can I apply ceramic coating on old or yellowed headlights?
Not directly. If your headlights are already oxidized or yellow, you must polish or restore them first. Applying a ceramic coating on damaged or cloudy lenses will only seal in the imperfections instead of fixing them.
5. What’s better for headlights: ceramic coating or PPF (paint protection film)?
Both offer excellent protection but serve different purposes. Ceramic coating defends against UV rays, chemicals, and oxidation, while PPF protects from rock chips and physical impact. If your main goal is to stop yellowing and keep the shine, ceramic coating is the smarter, more cost-effective choice.
Final Thoughts: Protect Your Headlights for the Long Run
So, to answer the question, Can You Ceramic Coat Headlights? Yes, and it’s a fantastic idea! It’s one of the most effective ways to stop that ugly yellowing before it even begins.
If you’ve been thinking about protecting your lights, try following the simple steps this weekend—it’s easier than you think, and the result is worth the effort.
Got a question about polishing your lights before you coat them? Just drop it in the comments!